However the DIY approach, especially if you don't have a local mentor, has a learning curve. Here is a collection of tips I've shared with friends:
Flying
- You’re not yet a good enough pilot yet to fly in wind more than about 5-8mph. This is a good site for looking at wind forecasts. Winds are usually the lowest in the early morning and evening.
- Water + Foamboard is a bad combination. (The paper will de-laminate). Be careful of dewy or rain soaked grass.
- ALWAYS double check your control surfaces are free-and-clear, and that they move in the right directions. I’ve screwed this up more than once and it always leads to a crash.
- Check your balance. A little tail heavy is ok, a little nose heavy is bad. Find the balance point on the plans (usually 1/3 of wing back from the front edge) and mark it, then just balance it on your finger tips. Position the battery to get the right balance.
- Remember, launch and land with the plane flying straight into the wind. When possible, keep the plane upwind of you when flying.
- Start with control surfaces for your first flight with a “neutral” setting is good, but you’ll almost certainly need some “up” elevator to get it in the air and to fly level.
- For your very first flight, it’s not a terrible idea to just toss the plane with no power at all to see what it does. Ideally, it will glide about 10-20 feet.
- I usually hand-launch…about ½ throttle and a little up-elevator. Hold the plane by the fuselage from the bottom and give it a normal-strength toss…like throwing a dart at a dart board or like you would throw a paper airplane (about that hard too.) Best to have one person on the stick and one to toss. Make sure your transmitter has a strap. Use it.
- If you want to take off from ground, do it from a hard surface. No way can you do it on grass. Same on landing, but you’re more likely to rip-up your prop landing on concrete.
- Trim your plane. Fly high, fly straight into the wind at about ½ throttle, and then use the trim buttons on your radio to get it to fly level and straight.
 |
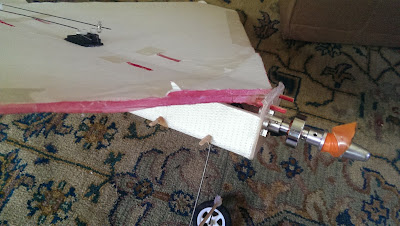
| My beat up FT Flyer. Note the reinforced alignment pegs at the top. |
Building
- Paint the bottom of your plane a contrasting color to help with orientation. I leave my top alone, and paint the bottom red. Use a spray can. Use ~3 very light coats. If you soak the paper, it will delaminate. Or you could just use colored tape to add some big stripes on the bottom of the wings/fuse.
- I like these wheels: http://www.hobbyking.com/hobbyking/store/__9855__Light_Foam_Wheel_Diam_60_Width_10mm_5pcs_bag_.html You need collars too: http://www.hobbyking.com/hobbyking/store/__43257__Landing_Gear_Wheel_Stop_Set_Collar_6x1_1mm_10pcs_.html ( I think that’s the right size…may need to measure the landing gear wire.)
- Crashes will cause the two front alignment skewers to rip out of the foamboard. Reinforce with hot glue, and if it gets bad, add another small layer of foamboard over the alignment pegs.
- Crashes and wet grass will damage the leading edge of the wings. Cover with either some clear packing tape, or with a really thin layer of hot glue. (Put the glue on and immediately wipe it off with a piece of foamboard.
- Crashes will elongate the holes in the side of the powerpod and your fuselage. (where the skewer passes through to secure the powerpod). Reinforce these with washers or thin credit-card plastic with an appropriate sized hole. When you crash the skewer will snap, but the holes will be ok and you can get back in the air.
Batteries
- There are 3 key numbers that describe batteries. For example, a "3s 25c 800mAh LiPo". The "3s" is the number of cells in series. For most foamies, you want a "3s" and ONLY a "3s". The "25c" is a measure of how quickly a plane can dump its charge. You want a minimum of a 20c battery. A higher number (e.g. 35c) is fine, but the price goes up. "800mAh" is the amount of power the batter holds. Bigger number here means longer flight, but more weight. For the FT flyer you want batteries between about 500 and 1000mAh. "LiPo" is the battery technology ("Lithium Polymer") Use LiPo batteries.
- If you’ve been flying for a while and your plane loses power, it’s the low battery protection circuit. Land right away, and don’t let it get that low again. This thing is handy: http://www.hobbyking.com/hobbyking/store/__19066__HobbyKing_Cell_Key_6s_Lipoly_Cell_checker.html .
- A fully charged battery is 12.6v. If you get below 11.3 or so, it needs to be recharged. If it gets below 10v, you could damage the cell.
- When you recharge your battery, the charger will tell you how many mAh it put in. Try not to use more than 80% of the battery capacity. (e.g. if you have an 800mAh battery, and it takes more than 640mAh to recharge it, you ran it too long.
- Recharge your battery at “1C”. That means if your battery is an 800mAh battery, set your charger for 800mA (aka 0.8 amps)
- Charge your batteries in your garage and in a battery bag. Not sitting on your desk in your house. (Google “lipo fire”). If you know you’re not going to fly for a long time, only charge them part way. (Your charger may have a “storage charge” setting.)
- If your battery gets damaged (hard crash that punctures the metal foil of the battery) fully discharge the battery and throw it away.