Friday, May 29, 2015

Flite Test foamboard plane tips for beginners

I've got a couple of friends who are getting into simple RC flying via the excellent FliteTest.com planes. The FT Flyer makes a great first plane. The plane is really inexpensive, and by taking a DIY approach to building, I think you're more likely to have success with the hobby. When the inevitable crashes occur, you're in a much better position to repair the damage if you built it in the first place.

However the DIY approach, especially if you don't have a local mentor, has a learning curve. Here is a collection of tips I've shared with friends:

Flying
  1. You’re not yet a good enough pilot yet to fly in wind more than about 5-8mph. This is a good site for looking at wind forecasts. Winds are usually the lowest in the early morning and evening.
  2. Water + Foamboard is a bad combination. (The paper will de-laminate). Be careful of dewy or rain soaked grass.
  3. ALWAYS double check your control surfaces are free-and-clear, and that they move in the right directions. I’ve screwed this up more than once and it always leads to a crash.
  4. Check your balance. A little tail heavy is ok, a little nose heavy is bad. Find the balance point on the plans (usually 1/3 of wing back from the front edge) and mark it, then just balance it on your finger tips. Position the battery to get the right balance.
  5. Remember, launch and land with the plane flying straight into the wind. When possible, keep the plane upwind of you when flying.
  6. Start with control surfaces for your first flight with a “neutral” setting is good, but you’ll almost certainly need some “up” elevator to get it in the air and to fly level.
  7. For your very first flight, it’s not a terrible idea to just toss the plane with no power at all to see what it does. Ideally, it will glide about 10-20 feet. 
  8. I usually hand-launch…about ½ throttle and a little up-elevator. Hold the plane by the fuselage from the bottom and give it a normal-strength toss…like throwing a dart at a dart board or like you would throw a paper airplane (about that hard too.) Best to have one person on the stick and one to toss. Make sure your transmitter has a strap. Use it.
  9. If you want to take off from ground, do it from a hard surface. No way can you do it on grass. Same on landing, but you’re more likely to rip-up your prop landing on concrete.
  10. Trim your plane. Fly high, fly straight into the wind at about ½ throttle, and then use the trim buttons on your radio to get it to fly level and straight.
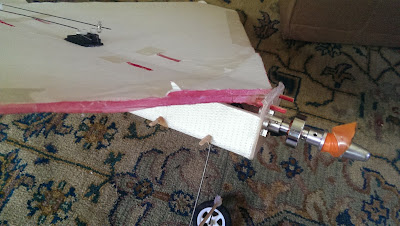
My beat up FT Flyer. Note the reinforced alignment pegs at the top.

Building
  1. Paint the bottom of your plane a contrasting color to help with orientation. I leave my top alone, and paint the bottom red. Use a spray can. Use ~3 very light coats. If you soak the paper, it will delaminate. Or you could just use colored tape to add some big stripes on the bottom of the wings/fuse.
  2. I like these wheels: http://www.hobbyking.com/hobbyking/store/__9855__Light_Foam_Wheel_Diam_60_Width_10mm_5pcs_bag_.html You need collars too: http://www.hobbyking.com/hobbyking/store/__43257__Landing_Gear_Wheel_Stop_Set_Collar_6x1_1mm_10pcs_.html ( I think that’s the right size…may need to measure the landing gear wire.)
  3. Crashes will cause the two front alignment skewers to rip out of the foamboard. Reinforce with hot glue, and if it gets bad, add another small layer of foamboard over the alignment pegs.
  4. Crashes and wet grass will damage the leading edge of the wings. Cover with either some clear packing tape, or with a really thin layer of hot glue. (Put the glue on and immediately wipe it off with a piece of foamboard.
  5. Crashes will elongate the holes in the side of the powerpod and your fuselage. (where the skewer passes through to secure the powerpod). Reinforce these with washers or thin credit-card plastic with an appropriate sized hole. When you crash the skewer will snap, but the holes will be ok and you can get back in the air.
Batteries

  1. There are 3 key numbers that describe batteries. For example, a "3s 25c 800mAh LiPo". The "3s" is the number of cells in series. For most foamies, you want a "3s" and ONLY a "3s". The "25c" is a measure of how quickly a plane can dump its charge. You want a minimum of a 20c battery. A higher number (e.g. 35c) is fine, but the price goes up. "800mAh" is the amount of power the batter holds. Bigger number here means longer flight, but more weight. For the FT flyer you want batteries between about 500 and 1000mAh. "LiPo" is the battery technology ("Lithium Polymer") Use LiPo batteries.
  2. If you’ve been flying for a while and  your plane loses power, it’s the low battery protection circuit. Land right away, and don’t let it get that low again. This thing is handy: http://www.hobbyking.com/hobbyking/store/__19066__HobbyKing_Cell_Key_6s_Lipoly_Cell_checker.html .
  3. A fully charged battery is 12.6v. If you get below 11.3 or so, it needs to be recharged. If it gets below 10v, you could damage the cell.
  4. When you recharge your battery, the charger will tell you how many mAh it put in. Try not to use more than 80% of the battery capacity. (e.g. if you have an 800mAh battery, and it takes more than 640mAh to recharge it, you ran it too long.
  5. Recharge your battery at “1C”. That means if your battery is an 800mAh battery, set your charger for 800mA (aka 0.8 amps)
  6. Charge your batteries in your garage and in a battery bag. Not sitting on your desk in your house. (Google “lipo fire”). If you know you’re not going to fly for a long time, only charge them part way. (Your charger may have a “storage charge” setting.)
  7. If your battery gets damaged (hard crash that punctures the metal foil of the battery) fully discharge the battery and throw it away.

Wednesday, November 05, 2014

Getting started with FliteTest foamboard RC planes

I'm a big fan of the FliteTest planes. I first blogged about them over a year ago here.

Since then, I've built (and destroyed) several more of their designs, and am still going back for more. I've tried to infect a few friends and coworkers with this hobby, and wanted to give them a list of links for more information. Here goes:

1. Watch the beginner series at FliteTest. This is a ten-part series (about 20 minutes each) of videos that are really well done.

2. My go-to plane recommendation for beginners is the FT-Flyer. You can scratch build this, but for first time, I'd recommend buying the "Speed Build Kit" from Flite Test. $33. You get a lot of the little bits and pieces you'll need. Eventually, you'll build an inventory of all this, but having everything you need is really helpful for first time.

3. The kit only includes the airframe. You'll also need electronics. These parts are more expensive, but you can re-use them in multiple planes. Get this kit,  I recommend Lazertoyz. I started with them, and keep buying from them after they replaced a part no-questions-asked that I thought (then) was faulty, but now realize failed due to my incompetence. Note you can buy the laser-cut speed-kit from them at the same time and possibly save on shipping.

4. You'll also need a few other "one time" things to get started:
- A batter charger. LiPo batteries need special chargers. Either somthing really cheap like this or something a little better like this will work. Buy a LiPo bag to be safe. I like this type.
- A transmitter and receiver. The DX6I is a popular first choice. I use this, and am very happy with it, but it's a little more complex to setup. Note that if you go with a 9XR, you'll also need to buy tx/rx modules and a battery for the transmitter. This puts it close to the cost of the better-built, but much simpler DX6I. (Both come in at around $130 complete.)
- The FliteTest foam wheels suck. Get some of these as an upgrade.
- Extra batteries. You want "3S" batteries. With a C rating of 20 or better. At a capacity between 500-1000mAh. Something like this 500 is great, or you could go a little bigger with this. ($3.64? That's crazy cheap. Buy 2.)
- Extra servos: Buy 4 extra servos with your base order from LazerToys or from HobbyKing. What you want are "9g servos". You can buy these everywhere, including eBay. You need 4 extra so you can build all three planes at once.
- Extra props: I have a tendency to crash and break props. Buy some of these with your LazerToyz order. Or some 8x4 or 8x4.3 from another source. (Hobby King, eBay).

Note that you could buy your motor, esc, batteries, props, servos, chargers, and radio from Hobby King at what would appear to be much lower cost, however I would not recommend someone brand new to the hobby start there. HK shipping can be really expensive and a challenge to figure out. The US warehouse is getting better stocked, but they can often be missing the one thing you need to get in the air, and then you need to deal with China shipping. Don't get me wrong, I love Hobby King for their selection and prices...but it's a far cry from shopping on Amazon. If that $50 radio doesn't work, are you really going to spend $40 to ship it back to them?

Or, you could go to your Local  Hobby Store and try to buy everything you need, but they won't have most of this, and will instead point you to one of their starter kits. I didn't follow that option because a) I'm kind of cheap when it comes to spending money on my hobbies, and b) I wanted to build something myself, not buy a ready-to-fly kit. The real problem with the all-in-one kits from the Local store is that you'll be spending $30 to replace that broken wing after your first flight. So, you won't fly it for fear of breaking it, or you'll fly it once and quit. The Foam Board plane won't break, and if it does, you just need a new piece of $1 foamboard from Dollar Tree.

So, at the end of the day you'll need:
Airframe: $33
Electronics: $60
Radio with Tx/Rx: $140 (but you can do this for a lot less...see the FliteTest episode.)
Charger, extra batteries, props, wheels, LiPo storage bag: $30

Then, watch the FliteTest videos on how to build and set everything up (or give me a shout.) Wait for a calm day on a large, open field, and go fly!

Monday, June 03, 2013

First foamboard planes

I've been itching to try some RC FPV flying, but wanted to start with something that would give me some more reaction time than the tricopter offers.

My tri flying has been progressing...fewer busted props and more drained battery packs. However, it's still far from an ingrained skill. I figured I'd try FPV with something that could glide in after a problem rather than plummet to the ground.

My first flying adventures were with an AXN Clouds Floater Jet which is a decent sized, inexpensive EPO glider with a pusher prop. When the wind is low, and it's trimmed out, I found it pretty easy to self-teach on. However, I have crashed it multiple times...to the point where it's getting fairly bent out of shape. The body is only about $40, but the shipping from China is killer. I like that I can repair my tri, so when a friend suggested FliteTest.com and their swappable self-builds based on Dollar Tree foamboard, I took a look. 

Since then, I've built three planes from their speed-build kits, and done another one from scratch. These are simple, three channel planes with flat wing profiles and a "power pod" that allows you to swap motor, esc, and receiver between different plane bodies. They are built with cheap foam board, hot glue, and tape.

If you crash, they're lightweight so damage is minimal. After a few crashes, they start to look like crap, but who cares. Just build another one for a couple bucks. I'm having a great time flying them. The plans are free, the materials are cheap, and the electronics are low-cost. Highly recommended for beginners or DIY flyers.

Scratch built planes at FliteTest.com
Enhanced by Zemanta

Saturday, December 22, 2012

Tricopter: What does it cost?

The most frequently asked questions I get when I'm flying:
- How high does it go?
- Did you build it yourself?
- How much does it cost?
- Do you let your kids fly it?

I'll touch on the "How much did it cost" question. This is clearly an "it depends" answer. If you're already flying RC planes, you may be able to build a tricopter for under $100. If you have absolutely nothing, you'll need ~$700-1,000. I'm sure it could be done for less, but you'll want multiple batteries ($15-20 each), you'll go through a lot of props ($1-2 each), and I picked up some spares and other things I thought I might need.

Costs are in four or five categories:
1. Structure ($50)
This is the wood, nuts/bolts, G10, foam, servo mounting, and something to contain/protect the electronics. I sourced most of this from my local hardware store and more exotic things from McMaster Carr.

2. Electronics ($250-450)
Controller, ESC, motor, Transmitter and Reciever, servo. Optional: lights, camera, simulator

3. Power ($120)
Batteries, charger, charger cables and power supply.

4. Tools ($100-400)
Soldering iron, drill/bits, heat gun, multimeter, misc hand tools.

5. Supplies ($100)
Wire, solder, propellers, connectors, shrink tubing, zip ties, glue, rubber bands.

6. Shipping: If you buy from HobbyKing.com you'll end up spending at least $100 in shipping.

I started from almost-scratch. (Had the tools, but had been out of RC for a while, so needed new transmitter, batteries, etc.)

Here's the list of everything I bought from Hobby King and McMaster. Add some wood for arms and some connectors and you're more than ready to go. Again, thanks to David at RCExplorer for a great build log and parts list. This is really just his list expanded for newbies.

Order #1. Messed up and only got one ESC! (Need 3)
DescriptionQuantity
Turnigy Accucel-6 50W 6A Balancer/Charger w/ accessories1Best one. You need some way to power it though.
Turnigy 2200mAh 3S 25C Lipo Pack2You should get 4
hexTronik DT750 Brushless Outrunner 750kv3Maybe get an extra
D-MG16 Metal Gear 2.9kg/.08sec/18.8g1Spare. I use the other one.
Turnigy Pure-Silicone Wire 16AWG (1mtr) BLACK2
Turnigy Pure-Silicone Wire 16AWG (1mtr) Red4
Front Wheel Steering Arm & Mount Set 40mm (5sets)1
Scorpion Lipoly Lock Strap 205mm (Small) x 31
Lithium Polymer Charge Pack 25x33cm JUMBO Sack1Get a smaller one
Prop Saver w/ Band 4mm (10pcs)1I don't use these. Skip.
Turnigy 380MG Micro Servo (Metal Gear) 3.6kg / .15sec / 15.6g1Has held up so far.
TURNIGY BESC Programming Card1
XT60 Male w/ 12AWG Silicon Wire 10cm (5pcs/bag)1
Servo Extention Lead 420mm (5pcs/bag)1These are great to have
PolyMax 3.5mm Gold Connectors 10 PAIRS (20PC)1Buy 2 of these
Hex locknuts M4 10pc1
USBasp AVR Programming Device for ATMEL proccessors1
Turnigy 9X 9Ch Transmitter w/ Module & 8ch Receiver (Mode 2) (v2 Firmware)1Cheap radio NOTE: Get the 9xR now. Better out-of-box experience
Hex Screw M3x16 (20pcs)1
Hex locknuts M3 10pc2
10CM Male to Male Servo Lead (JR) 26AWG (10pcs/set)1
Turnigy 2650mAh 3S 1C LLF Tx Pack (Futaba/JR)1For the radio
TURNIGY Plush 18amp Speed Controller1Actually need 3. Whoops
Hobbyking KK2.0 Multi-rotor LCD Flight Control Board1
GWS EP Counter Rotating Propeller (RH-1047 254x119mm) (6pcs/set)1Buy 4 packs
GWS EP Propeller (RD-1047 254x119mm) (6pcs/set)1Buy 7 packs
Turnigy Heat Shrink Tube 20mm Transparent (1mtr)1
EV830/20G 30 Min Cure Clear Epoxy1Didn't use
Peel-n-stick foam tape. 10x5inch 4mm thick1Useful
Hobby King Discovery Buzzer1
USB Simulator Cable RealFlight G4.51Use with simulator
Extra Length Cardboard Box and Packing 439g1
TURNIGY 3~8S Voltage Detector1I now use KK2 board feature for this. Skip
ShipmentEMS Express to USA (Max 5kg) $81.73
Taxes$0.00
Total$356.29


Order 2: Speed controllers I forgot on first order, and extras of things I wanted
DescriptionQuantity
TURNIGY Plush 18amp Speed Controller32 need plus spare
GWS EP Counter Rotating Propeller (RH-1047 254x119mm) (6pcs/set)1
GWS EP Propeller (RD-1047 254x119mm) (6pcs/set)1
Nylon XT60 Connectors Male/Female (5 pairs) GENUINE1
hexTronik DT750 Brushless Outrunner 750kv1Spare
PolyMax 3.5mm Gold Connectors 10 PAIRS (20PC)1
Charging harness1To charge TX battery
Turnigy 4mm Heat Shrink Tube - RED (1mtr)1
ShipmentEMS Express to USA (under 500g) $18.95
Taxes$0.00
Total$69.68

Order 3: Lighting and more extras
DescriptionQuantity
Turnigy Receiver Controlled Switch1
Turnigy High Density R/C LED Flexible Strip-Green (1mtr)1Buy a red and a white too
Servo Terminals (JR) Gold Plated (10pairs/set)1
Flat 26AWG servo wire 1mtr (R/B/W)1Buy 3-4 m
Servo Lead Lock (5pcs/bag)1Useful
JST-XH 3S Wire Extension 20cm (10pcs/bag)1
Balance Plug Savers (JST-XH 5s) (5pc Per Bag)1
JST-XH 2S Wire Extension 20cm (10pcs/bag)1Useful for charging
Hex locknuts M4 10pc1Spares
ShipmentInternational (Registered) Air Mail 201-300g $6.99
Taxes$0.00
Total$25.90
Credit Total
Order 4: 2 more batteries buying these from your local warehouse is a good idea.
DescriptionQuantity
ZIPPY Compact 2200mAh 3S 25C Lipo Pack (USA Warehouse)2IN STOCK
ShipmentUSPS Priority Mail 2-3Day US-PM $6.36 08cdce62-b9cd-4b38-afb9-9c600a07282c
Taxes$0.00
Total$28.74
Order 5: After my batteries were getting dinged up, I decided to shrink wrap them. Picked up a few more things as well.
DescriptionQuantity
M3 x 20mm Nylon Screws (10pcs/bag)1Bought others from ebay as kit
M3 Nylon Nut (10pcs/bag)2
GWS EP Propeller (RD-1047 254x119mm) (6pcs/set)1
Grub Screw Set M3x4 10 Pack1Spares for motor mounting
M3X10 Nylon Screws (10pcs/bag)1
Turnigy Heat Shrink Tube 50mm Blue (1mtr)1I wrap my batteries with this
Front Wheel Steering Arm & Mount Set 40mm (5sets)1Spares. Not necessary
ShipmentInternational (Registered) Air Mail 201-300g $6.99
Taxes$0.00
Total$18.74
Order 1b: From McMaster Carr:
19910T151 EachMultipurpose Garolite (g-10), 1/16" Thick, 12" X 12"
288625K631 EachO1 Tool Steel Tight-tolerance Rod, 4 Mm Diameter, 3' Length
37132K7841 PackChemical-resistant Pvc Heat-shrink Tubing, 1" Id Before, 1/2" Id After, 6" Length, Clear
47130K121 PackStandard Nylon Cable Tie, 4"l, 7/8"bundle Dia, 18# Tensile Strength, White
530565A2631 EachMetric Black&gold Oxide Hss Jobbers Drill Bit, 4.2mm, 83mm Oal, 49.2mm Drill Depth, 135 Deg Point
67132K731 PackChemical-resistant Pvc Heat-shrink Tubing, 3/16" Id Before, 3/32" Id After, 6" Length, Black
This was $27 with $10 shipping.

Thursday, November 22, 2012

Tricopter build tips: RC Explorer 2.5 for newbies


I recently got back into radio controlled flying after a two decade break. I wanted to fly something in a smaller space than my old nitro-engine trainer, and when I saw a mention of a $100 tricopter build on hack-a-day I started looking into multi-rotors. 

I quickly figured out that the only way you could build a $100 tricopter would be if you were an RC hobbyist with a lot of key parts from another aircraft already. I had the normal assortment of hand tools and electronic tools, but was essentially starting from scratch on the RC front. I ended up spending around $400 on parts plus all the odds and ends you need when you start any new hobby. If you don't have a good soldering iron, heat-gun, and multimeter, add another $100. 

David's: RCExplorer Tricopter 2.5 is a popular design for home-built tris. He's got a very detailed build log at the site, and I followed his suggestions when I could. The overall design is fairly simple, and his pictures and parts list are a boon to a newbie like me. However, David is an experienced builder and pilot, and if you're building one of these for the first time (like me) there are some things you should know.  

Other stuff to buy  

Radio: Get the Turnigy 9x radio. Add a programming interface to it and flash it with ER9x firmware. This requires some fine soldering technique to install the programming interface. If you're not comfortable with that, just use the stock firmware, or buy a drop-in programmer. Word on the street (November, 2012) is a new Turnigy 9xR is about to be released, and it will have better firmware and a programming interface already installed. Watch for it on Hobby King. 

Controller: IMPORTANT: Use the KK2 controller available from HobbyKing. $30. Don't use the older ones that David used. Ongoing improvements and development by the software author. Don't be confused by older ones with a V3 or V4. What you want is a "KK2" with the LCD screen. There are more expensive controllers out there that will allow easier flying. But I wanted something I could "fly", not program and watch.  

Batteries: Buy at least 2, probably 4 or 6. I get about 10-11 minutes of hover time, and about 8-9 minutes of active flying time to a 2200mAh battery. At first, 20 minutes may be fine for an outing, but later, you'll want at least four. It takes a while to charge the batteries, and it's possible to damage them in a crash. 

Battery Charger: I bought this one and am happy with it. If you get a LiPo for your transmitter, you will probably need this harness. Note that most battery chargers do not come with a wall plug/adapter. You may have one lying around (has to be 12 to 15v and at least 2amp or higher), or may be able to convert an old computer power supply. Or just buy one. 

Props: When you crash, you break props. Buy a lot of props. In the first few weeks of flying, you'll easily break a couple each time out. I've had bad crashes that broke all three. Buying 24 normal and 12 counter rotating would not be excessive if you've never flown before. 

Nylon stand-offs, screws, and nuts. I bought a variety of these in m3 size. You can find collections of them cheap on eBay, or buy from Hobby King. These are necessary for mounting the controller board and protectors. 

Variety of wired servo and battery extensions: Getting some wired servo or connector extensions is a good idea. Then when you need a new connector, you just snip them in half. 


Changes to the design for N00bs: 


Landing gear: If this is your first tri, you are going to land/crash hard frequently. I started with a simple landing gear like on the David's design, but got tired of replacing zip ties them every time I landed hard. I ended up cutting 1/2" rings off a 3" PVC pipe connector, cutting open the circle and using the heat-gun to melt and shape it into an open P shape. (See picture above) 

Rear servo mounting: My servo kept wiggling away from the servo horn. I added some double sided tape between the servo and the arm, and another big zip tie to keep the whole thing held together, and the problem is gone. (In the picture above, the extra zip-tie is disconnected. Be careful your zip ties don't restrict the yaw mechanism.

Motor mounting: I added some really thin foam between the motor mount and the arm. Helps keep the motor from wiggling/vibrating out of place. (Yellow stuff in the picture) 


Board protection: You will definitely flip your aircraft or otherwise crash in a way that will damage the controller. I put mine in a Gladware snack box, and later upgraded to a better looking box, pictured above. (I used this one but I bought it locally for under $1.) Highly recommended, as it fits the KK2 and the RX perfectly, has a flat mounting surface, and the clear top allows you to see the display. What you're looking for is something that will hold a deck of playing cards. 

Board mounting: Sticky pads like David uses aren't working for me. Get some nylon screws, nuts, and stand-offs to more securely mount your board protector and the board itself. 


Prop mounting: some people attach the prop between the motor bell and a nylock nut. I use a sandwich: nylock nut/washer/prop/washer/nylock nut. I feel the props are much more secure this way. Check for loose props after crashes and as a pre-flight check. (Picture shows the prop mounting, my old landing gear, and a servo/motor mount that would often wiggle free.)
  
Wiring: You might want to use a power distribution board instead of soldering everything together. Probably adds weight, and I'm not sure where I'd mount it, but it would make building and modifying later much easier. Also, I find these pre-wired connectors much easier to wire up than just the bullet plugs in David's build.  

Battery protection: Again, David's an expert pilot. You're probably not. The battery hanging off the bottom of the tri is vulnerable. I poked holes in a couple batteries before I wrapped them in shrink-tubing. I'd recommend using some of this to protect your batteries. Adds weight, but prevents zip ties or rocks from damaging your battery.  


Cockpit/canopy: Add a foam "cockpit" to the top of your board mount. I assume you're learning to fly "Line of Sight" first. You need something at the front of the tri to help you keep your orientation, and to focus on. If you don't, you'll have a tendency to watch the tail rotor, and that's a helicopter flying "don’t" (You need to watch the nose, not the tail.) Mine is cut out of styrofoam and hot-glued to the lid. 

Battery Mount: I used a longer piece of wood than David, and used a combination of rubber bands, zip ties, and foam to attach it to the bottom of the tri. (Kind of visible in the cockpit photo)

Lessons learned: 

RC connectors, in general, are not keyed. It's possible and easy to plug stuff in wrong/backward and sometimes fry things. These batteries have a ton of power in them, and they're not shy about using it. 

Charging: LiPo power sources were new to me. No one tells you how to plug things in. Be careful. This is the kind of thing that is obvious if you're an old-timer, but can be utterly baffling unless someone shows you. These things aren't like niCad chargers. You need to plug in a balance plug and a charging plug. Be careful, and don't just guess at stuff, as plugging things in wrong/upside down can easily damage the battery, your charger, or start a fire. 

Balancing: Balance your motors without props. Balance your props on a balancing stand. Then dynamically balance each arm/prop. I use clear tape on the top surface to balance my props, and have had no trouble. If the hub is out of balance, I file some material away on the heavy side. 

Zip ties: These things are awesome and cheap. Buy a lot and replace as needed. Watch for ones that stretch but don't break after a crash. When attaching, wedge a thumbnail against the locking mechanism, and use a pliers to pull the free end tight. 

Props: Like I said earlier: buy lots and replace when nicked or bent. If I just "trim some grass", I don't replace. But you may want to recheck the balance. When you mount props, make sure they're right-side up, and spinning in the right direction. If props spin backwards, swap two of the wires coming from the ESC to the motor. Check to make sure your props are tight before flying and after crashes. 

Learning to Fly: 
I'll do this in another post.